Developer Guide
- Acknowledgements
- Setting up, getting started
- Design
- Implementation
- Documentation, logging, testing, configuration, dev-ops
- Appendix A: Product Scope
- Appendix B: User stories
- Appendix C: Use cases
- Appendix D: Non-Functional Requirements
- Appendix E: Instructions for manual testing
Acknowledgements
- This project is based on the AddressBook-Level3 project created by the SE-EDU initiative
Setting up, getting started
Refer to the guide Setting up and getting started.
Design
.puml files used to create diagrams in this document docs/diagrams folder. Refer to the PlantUML Tutorial at se-edu/guides to learn how to create and edit diagrams.
Architecture
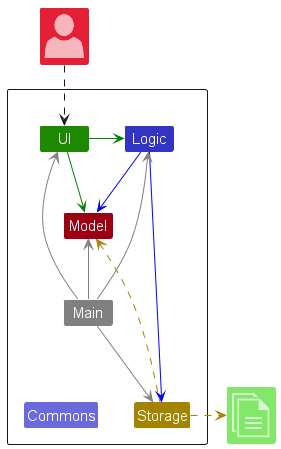
The Architecture Diagram given above explains the high-level design of the App.
Given below is a quick overview of main components and how they interact with each other.
Main components of the architecture
Main (consisting of classes Main and MainApp) is in charge of the app launch and shut down.
- At app launch, it initializes the other components in the correct sequence, and connects them up with each other.
- At shut down, it shuts down the other components and invokes cleanup methods where necessary.
The bulk of the app’s work is done by the following four components:
-
UI: The UI of the App. -
Logic: The command executor. -
Model: Holds the data of the App in memory. -
Storage: Reads data from, and writes data to, the hard disk.
Commons represents a collection of classes used by multiple other components.
How the architecture components interact with each other
The Sequence Diagram below shows how the components interact with each other for the scenario where the user issues the command delete-a 1.

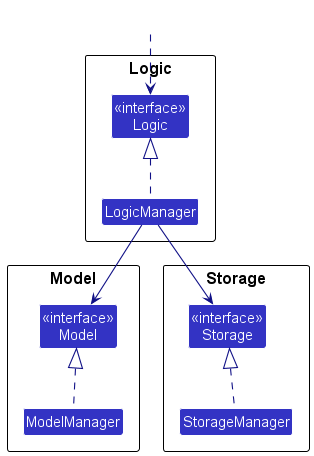
Each of the four main components (also shown in the diagram above),
- defines its API in an
interfacewith the same name as the Component. - implements its functionality using a concrete
{Component Name}Managerclass (which follows the corresponding APIinterfacementioned in the previous point).
For example, the Logic component defines its API in the Logic.java interface and implements its functionality using the LogicManager.java class which follows the Logic interface. Other components interact with a given component through its interface rather than the concrete class (reason: to prevent outside component’s being coupled to the implementation of a component), as illustrated in the (partial) class diagram below.
The sections below give more details of each component.
UI component
The API of this component is specified in Ui.java
Given below is a partial diagram of the UI component. This diagram gives a high level view of the structure of the Ui components.
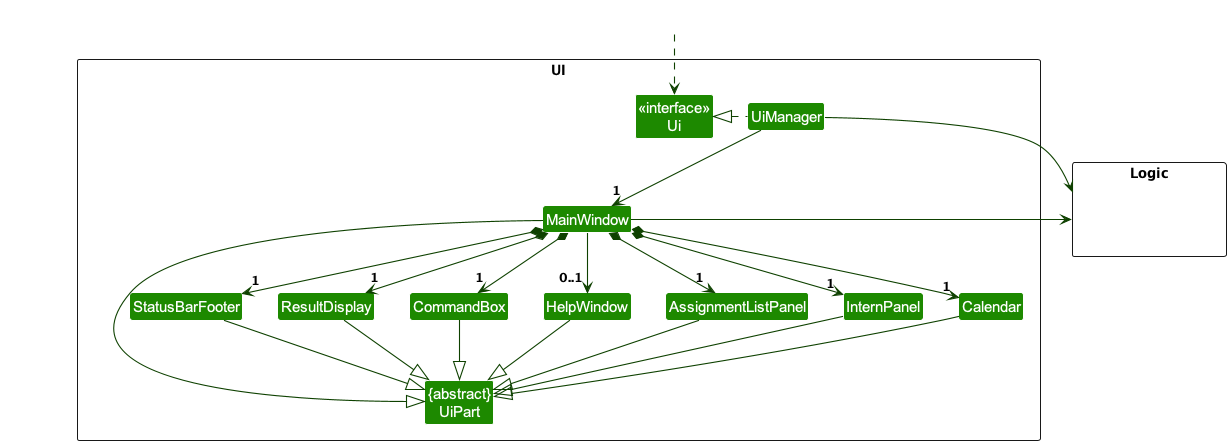
In particular, the UI consists of a MainWindow that is made up of smaller components. Some notable examples are CommandBox,
ResultDisplay, AssignmentListPanel, InternPanel and Calendar.
All these, including the MainWindow,
inherit from the abstract UiPart class which captures the commonalities between classes that
represent parts of the visible GUI.
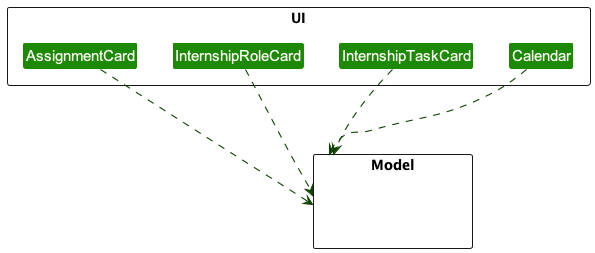
Below is another partial diagram to show the dependencies between the higher level UI components (such as InternPanel), and the lower level components (such as InternshipRolePanel etc.).

The UI component uses the JavaFx UI framework. The layout of these UI parts are defined in matching .fxml files that are in the src/main/resources/view folder. For example, the layout of the MainWindow is specified in MainWindow.fxml
The UI component,
- executes user commands using the
Logiccomponent. - listens for changes to
Modeldata so that the UI can be updated with the modified data. - keeps a reference to the
Logiccomponent, because theUIrelies on theLogicto execute commands. - depends on some classes in the
Modelcomponent, as it displaysAssignment,InternshipRoleorInternshipTaskobjects residing in theModel.
This dependency on the Model class is given in the below partial diagram:
The UI component is responsible for the following key features:
View Changes
- Listen for different view changes, using the respective inputs when users call the respective list commands
- Update the UI accordingly to display the selected view
Calendar
- Whenever a user performs an add, or delete operation, update the names of the tasks in the calendar accordingly
- Switching between different calendar months using buttons
Logic component
API : Logic.java
Here’s a (partial) class diagram of the Logic component:
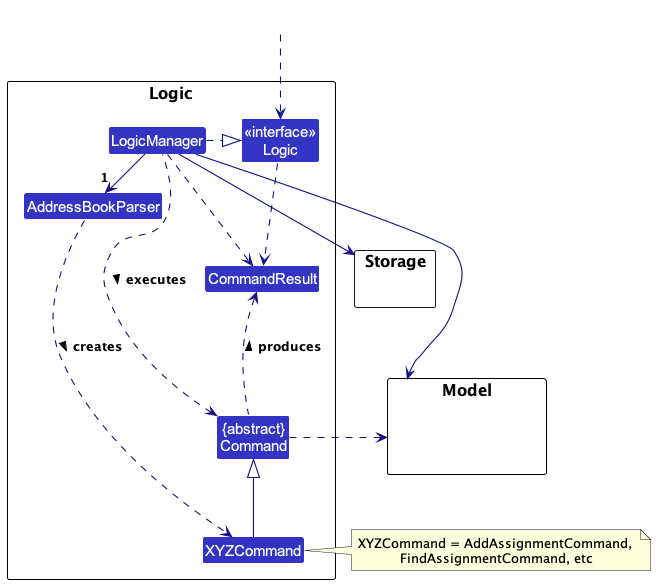
How the Logic component works:
- When
Logicis called upon to execute a command, it is passed to anAddressBookParserobject which in turn creates a parser that matches the command (e.g.,AddAssignmentParser) and uses it to parse the command. - This results in a
Commandobject (more precisely, an object of one of its subclasses e.g.,AddAssignmentCommand) which is executed by theLogicManager. - The command can communicate with the
Modelwhen it is executed (e.g. to add an assignment). - The result of the command execution is encapsulated as a
CommandResultobject which is returned back fromLogic.
The sequence diagram below illustrates the interactions within the Logic component, taking execute("delete-a 1") API call as an example.
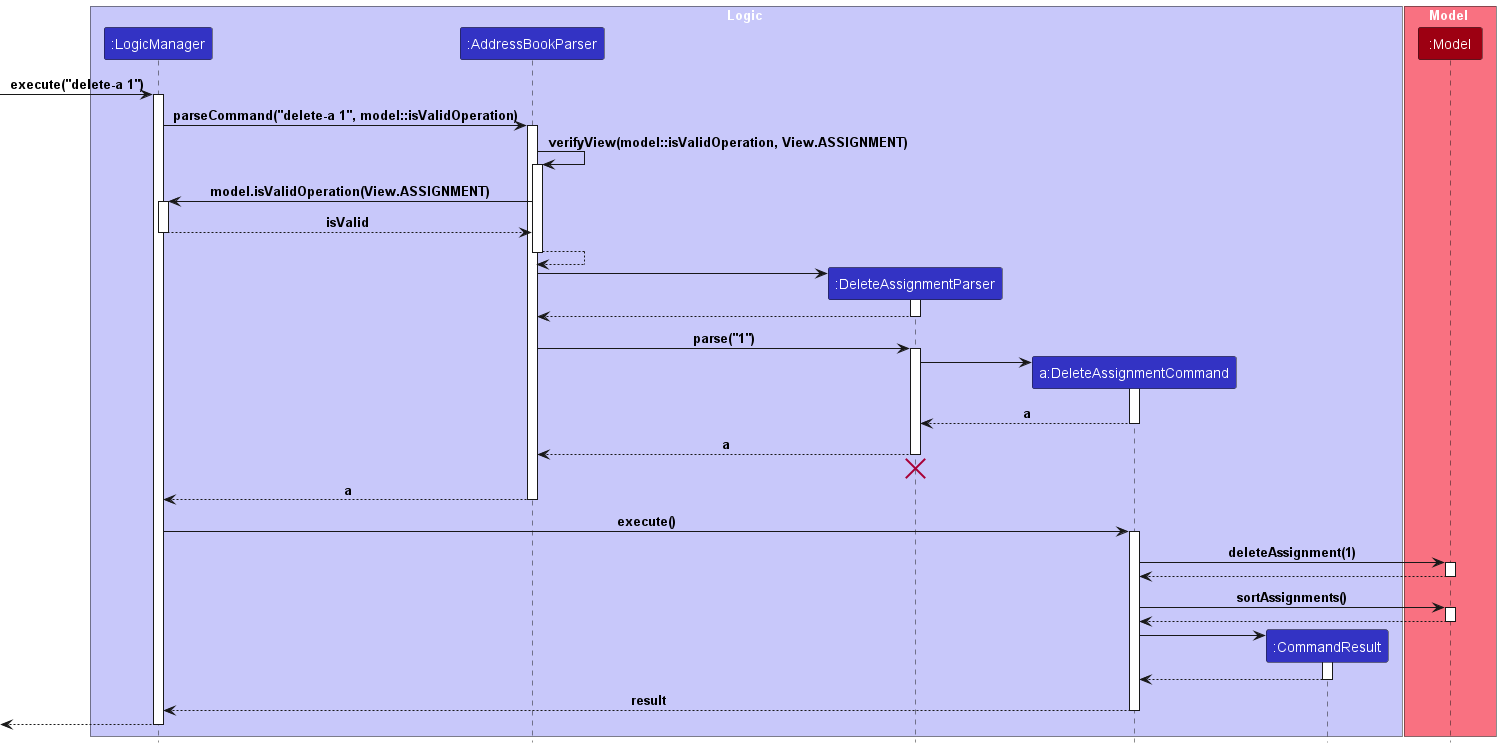
DeleteAssignmentCommandParser should end at the destroy marker (X) but due to a limitation of PlantUML, the lifeline reaches the end of diagram.
Here are the other classes in Logic (omitted from the class diagram above) that are used for parsing a user command:
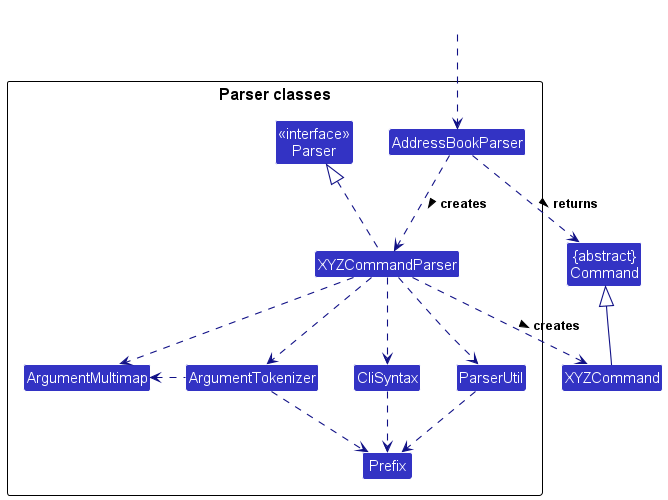
How the parsing works:
- When called upon to parse a user command, the
AddressBookParserclass creates anXYZParser(XYZis a placeholder for the specific command name e.g.,AddAssignmentParser) which uses the other classes shown above to parse the user command and create aXYZCommandobject (e.g.,AddAssignmentCommand) which theAddressBookParserreturns back as aCommandobject. - All
XYZParserclasses (e.g.,AddAssignmentParser,DeleteAssignmentParser, …) inherit from theParserinterface so that they can be treated similarly where possible e.g, during testing.
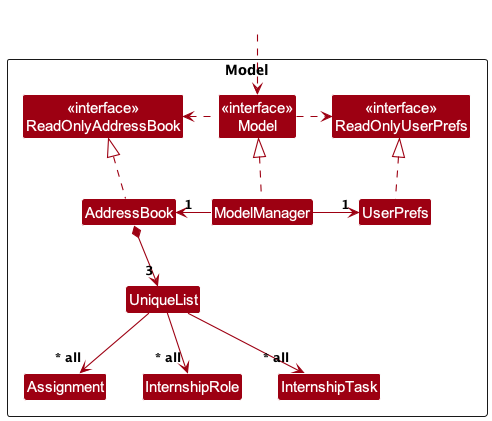
Model component
API : Model.java
Below is an overall high level view of the Model component
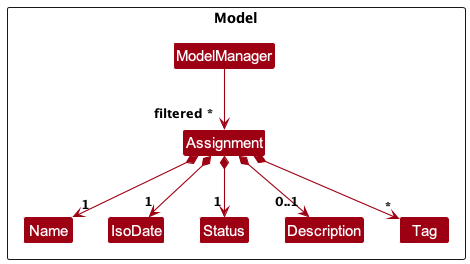
Assignment portion of the Model component
Internship portion of the Model component
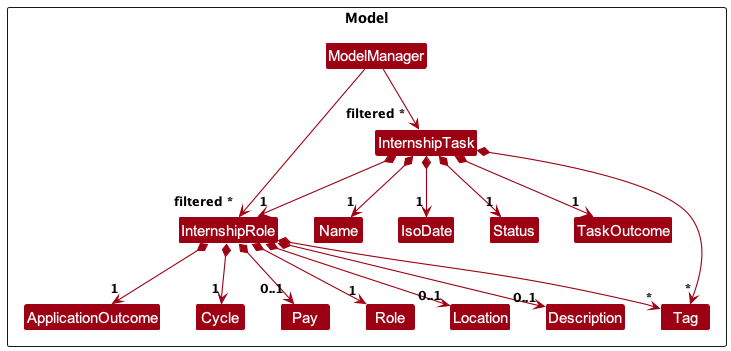
The Assignment, InternshipRole, InternshipTask components:
- these components implement the Unique Interface.
- stores the address book data i.e., all
Assignment,InternshipRole,InternshipTaskobjects (are contained in a separateUniqueListobject). - stores the currently ‘selected’ component objects (e.g., results of a search query) as a separate filtered list which is exposed to outsiders as an
unmodifiable
ObservableListthat can be ‘observed’ e.g. the UI can be bound to this list so that the UI automatically updates when the data in the list change. - stores a
UserPrefobject that represents the user’s preferences. This is exposed to the outside as aReadOnlyUserPrefobjects. - does not depend on any of the other three components (as these components represent data entities of the domain, they should make sense on their own without depending on other components)
Storage component
API : Storage.java
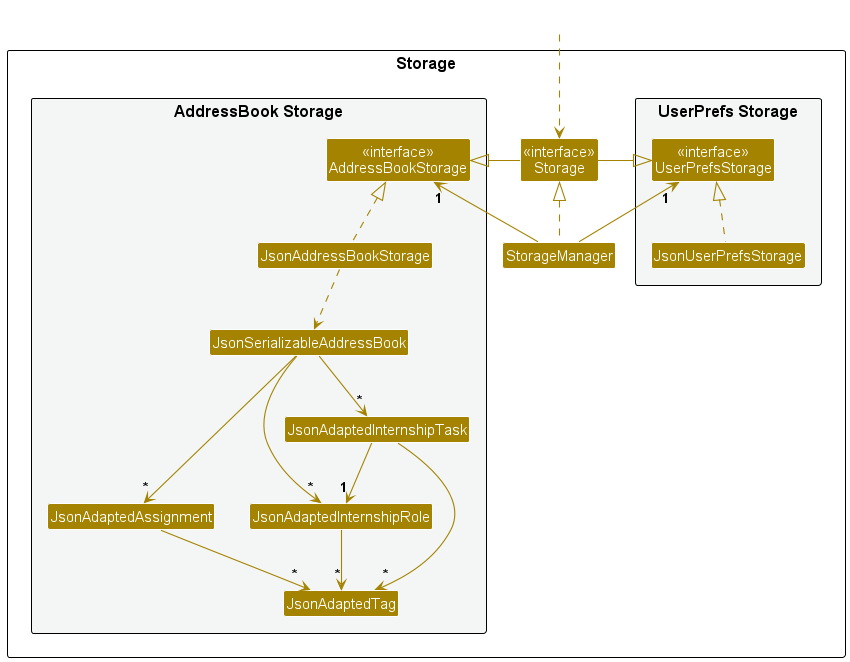
The Storage component plays a crucial role in your application by handling the persistence of data, specifically address book data and user preference data, in JSON format.
It provides methods to save this data and retrieve it, converting it into corresponding objects when needed. This section will provide an overview of the Storage component,
its key features, dependencies, and the classes it interacts with.
The Storage component is responsible for the following key features:
-
Data Serialization: It can save data, such as address book entries and user preferences, in JSON format. Serialization is the process of converting these data objects into a structured text format, making them suitable for storage and future retrieval.
-
Data Deserialization: It can read data back from the storage, deserialize it, and recreate corresponding objects. This feature is essential for restoring the application’s state from previously saved data.
-
Inheritance from AddressBookStorage and UserPrefStorage: The Storage component is designed to be versatile. It inherits from both AddressBookStorage and UserPrefStorage, allowing it to be treated as either one, depending on whether you need to work with address book data or user preference data. This inheritance simplifies the codebase by providing a single entry point for storage operations, regardless of the data type.
Dependencies
The Storage component relies on certain classes from the Model component, as its primary responsibility is to manage the persistence of objects that belong to the model. Currently, these classes include:
-
JsonAdaptedAssignment: This class is used to store assignment data in a format suitable for JSON serialization. It is essential for saving and retrieving assignment-related information.
-
JsonAdaptedInternshipRole: To store internship role data. This class ensures that internship roles can be saved and restored accurately.
-
JsonAdaptedInternshipTask: This class handles the serialization and deserialization of internship task data. It is crucial for maintaining the integrity of internship-related information.
These dependencies illustrate the close relationship between the Storage and Model components, as the Storage component is responsible for managing the persistence of data associated with the Model.
Common classes
Classes used by multiple components are in the seedu.addressbook.commons package.
Implementation
This section describes some noteworthy details on how certain features are implemented.
The implementation for InternshipRole and InternshipTask are very similar to Assignment, hence we only detail the implementation for Assignment features.
We have included for reference which internship features are similar to the assignment feature. Please note this does not mean they are exactly identical, there
may be some differences between the implementation.
Add Assignment feature
Similar internship feature: Add internship Role feature and Add internship Task feature
What it does
Adds an assignment to the list of currently existing assignments. Users are able to add any valid assignment to the list. If a record of the same assignment already exists in the list, the command will not be allowed and an error will be thrown to alert user.
Example Use: add-a n/Assignment 1 e/2023-11-11 16:00 d/Important Assignment s/complete p/2023-11-10 t/Individual
Implementation
Upon entry of the add assignment command, an AddAssignmentCommand class is created. The AddAssignmentCommand class extends the abstract
Command class and implements the execute() method.
Before execution of this method, the verifyView() method is called, to verify that the user is in the Assignment view
Upon execution of this method, an Assignment object is added to the model’s list of assignments if all the attributes provided are
valid and a duplicate instance does not exist.
After the addition of the new assignment, the assignments are sorted by deadline automatically.
Given below is an example usage scenario of how the add assignment command behaves at each step.
Step 1. User launches the application
Step 2. User executes add-a n/Assignment 1 e/2023-11-11 16:00 d/Important Assignment s/complete p/2023-11-10 t/Individual to save a new assignment.
Step 3. The assignment is added to the model’s list of assignments if valid.
The following sequence diagram illustrates how the add assignment operation works:
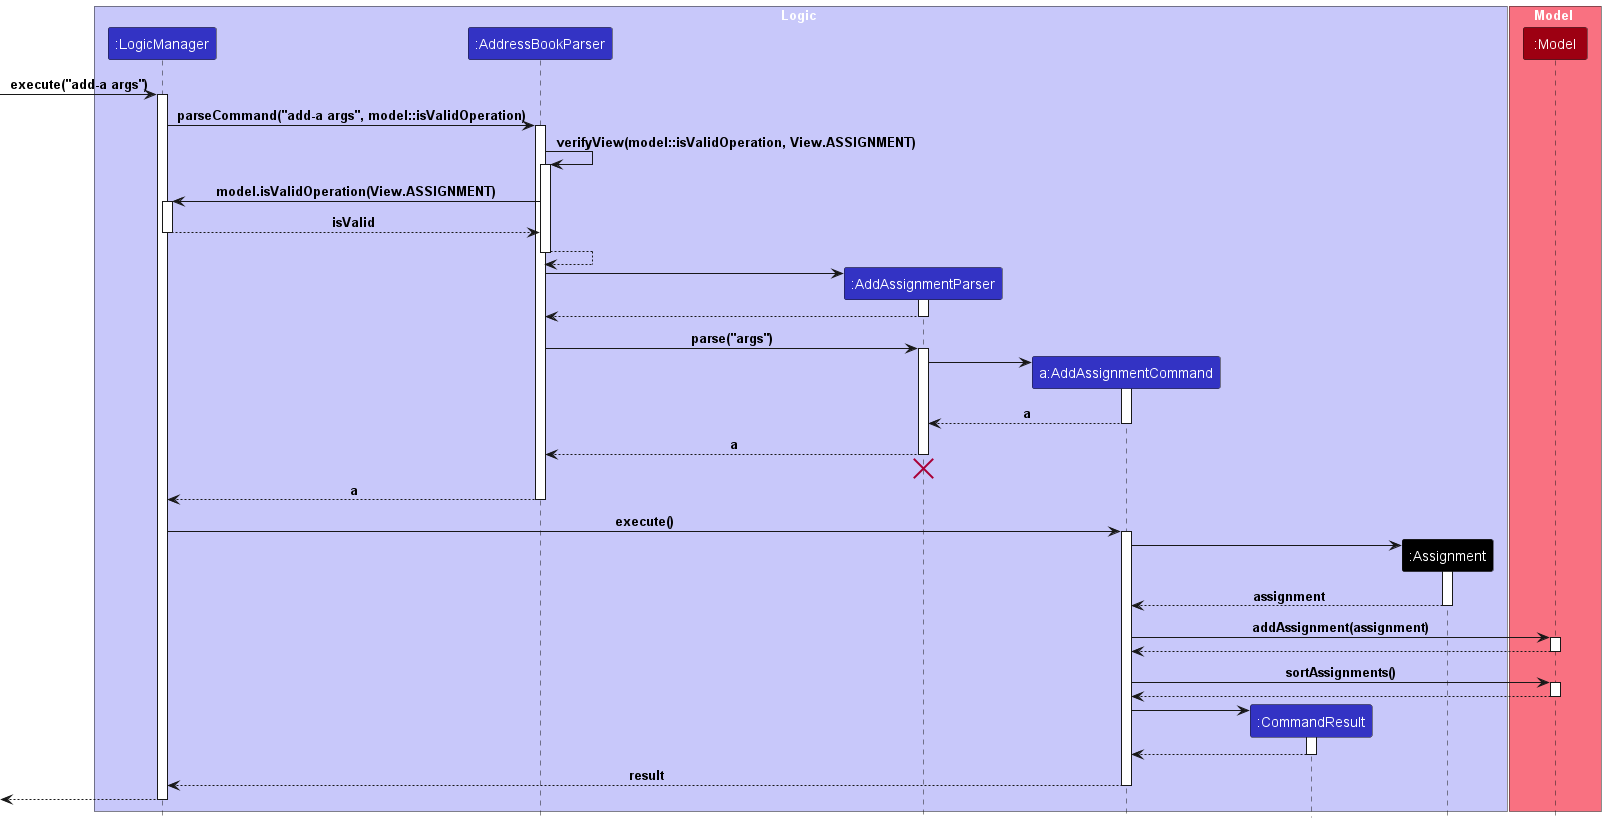
-
args: Refers to a valid sequence of arguments provided by the user.
Delete Assignment Feature
Similar internship feature: Delete internship Role feature and Delete internship Task feature
What it does
Deletes a assignment at the specified one-based index of list of currently existing/found assignments. Users are able to delete any assignment in the list. If an index larger than or equal to the size of the assignment’s list is provided, the command will not be allowed and an error will be thrown to alert user.
Example Use: delete-a 1
Implementation
Upon entry of the delete assignment command, a DeleteAssignmentCommand class is created. The DeleteAssignmentCommand class
extends the abstract Command class and implements the execute() method.
Before execution of this method, the verifyView() method is called, to verify that the user is in the Assignment view
Upon execution of this method, the assignment at specified one-based index is removed if the index provided is valid.
After the deletion of the specified assignment, the assignments are sorted by deadline automatically.
Given below is an example usage scenario of how the delete assignment command behaves at each step.
Step 1. User launches the application
Step 2. User executes delete-a 1 to delete the assignment at index 1 (one-based indexing).
Step 3. The assignment at this index is removed if the index provided is valid.
The following sequence diagram illustrates how the delete assignment operation works:
Edit Assignment Feature
Similar internship feature: Edit internship Task feature
What it does
Users can edit the description of the specific assignments in the list by providing the new description. Existing description value will be
updated to the new values. The assignment to be edited can be specified through the assignment’s index.
Example Use: edit-a i/1 d/New description
Implementation
Upon entry of the edit assignment command, an EditAssignmentCommand class is created. The EditAssignmentCommand class extends
the abstract Command class and implements the execute() method. A new Assignment object is created with the new description,
with the attributes of the old Assignment object copied over.
Before execution of this method, the verifyView() method is called, to verify that the user is in the Assignment view
Upon execution of EditAssignmentCommand, an Assignment object is added to the model’s list of assignments if all the attributes
provided are valid.
The following activity diagram illustrates the user flow for editing an assignment:
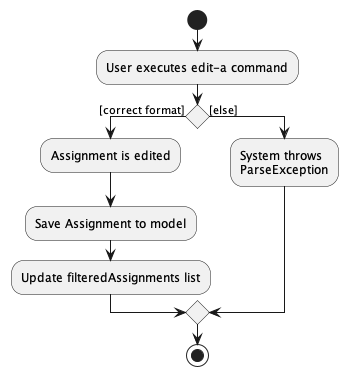
Given below is an example usage scenario of how the edit assignment command behaves at each step.
Step 1. User launches the application
Step 2. User executes edit-a i/1 d/New description to edit an assignment.
Step 3. The assignment is edited and saved to the model’s list of assignments if valid.
Step 4. filteredAssignmentList is updated so that the UI can display the edited assignments.
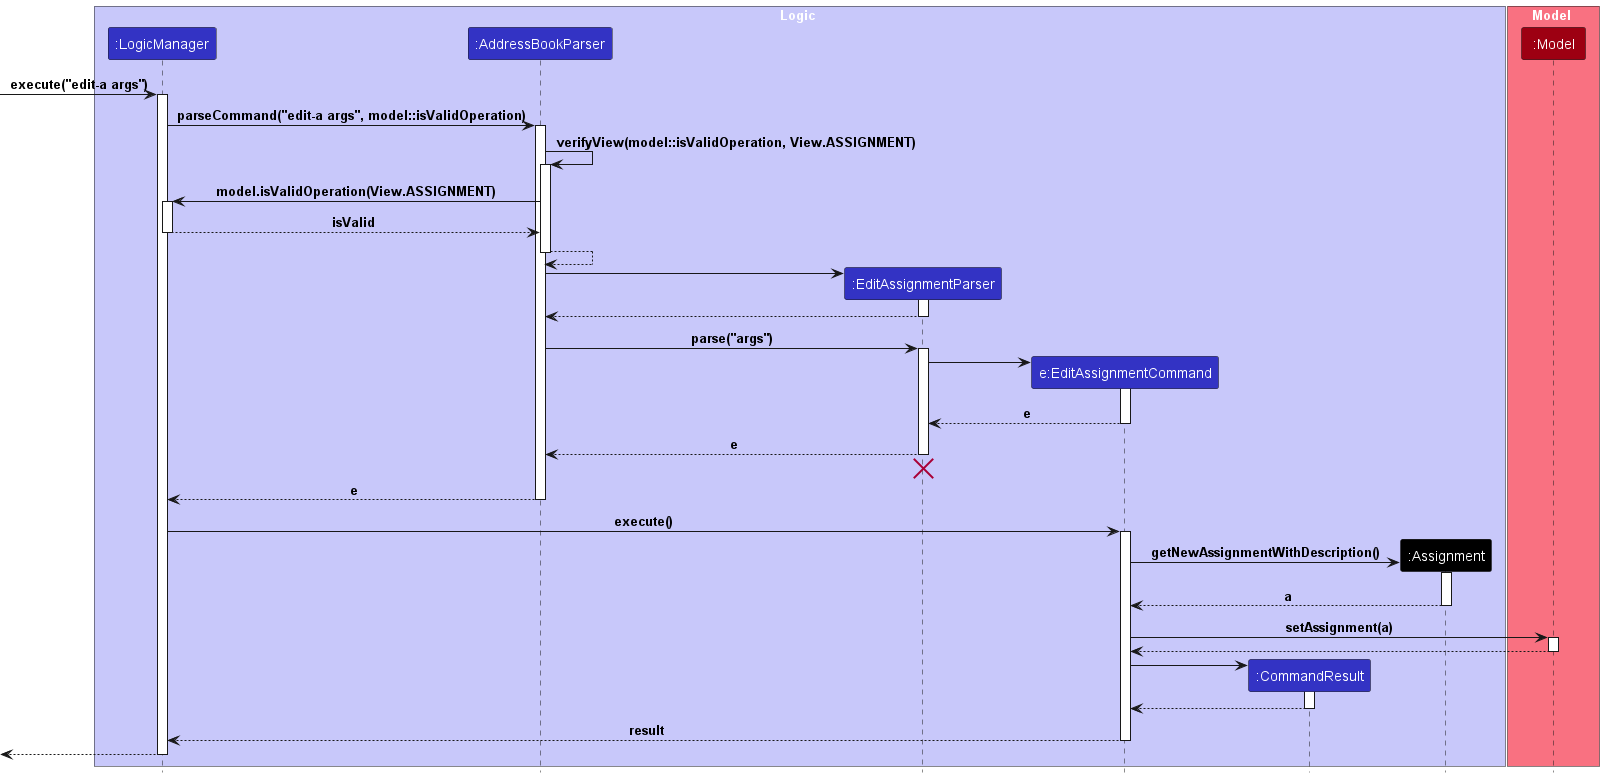
The following sequence diagram illustrates how the edit assignment operation works:
Mark Assignment Feature
Similar internship feature: Mark internship Task feature
What it does
Changes the status of an assignment at the specified one-based index of the assignment list from incomplete to complete.
If the index provided are larger than size of the list, the command will not be allowed and an error will
be thrown. If specified assignment is already complete, the command will not be allowed and an error will be thrown.
Example Use: mark-a 1
Implementation
Upon entry of the mark assignment command, a MarkAssignmentCommand class is created. The MarkAssignmentCommand class extends the
abstract Command class and implements the execute() method.
Before execution of this method, the verifyView() method is called, to verify that the user is in the Assignment view.
Upon execution of this method, the status of the assignment at specified one-based index is updated to complete.
Given below is an example usage scenario of how the mark assignment command behaves at each step.
Step 1. User launches the application
Step 2. User executes mark-a 1 to change the status of the assignment at index 1 to complete.
Step 3. If the index provided is valid and assignment is currently incomplete, the assignment at index 1 is updated to be complete
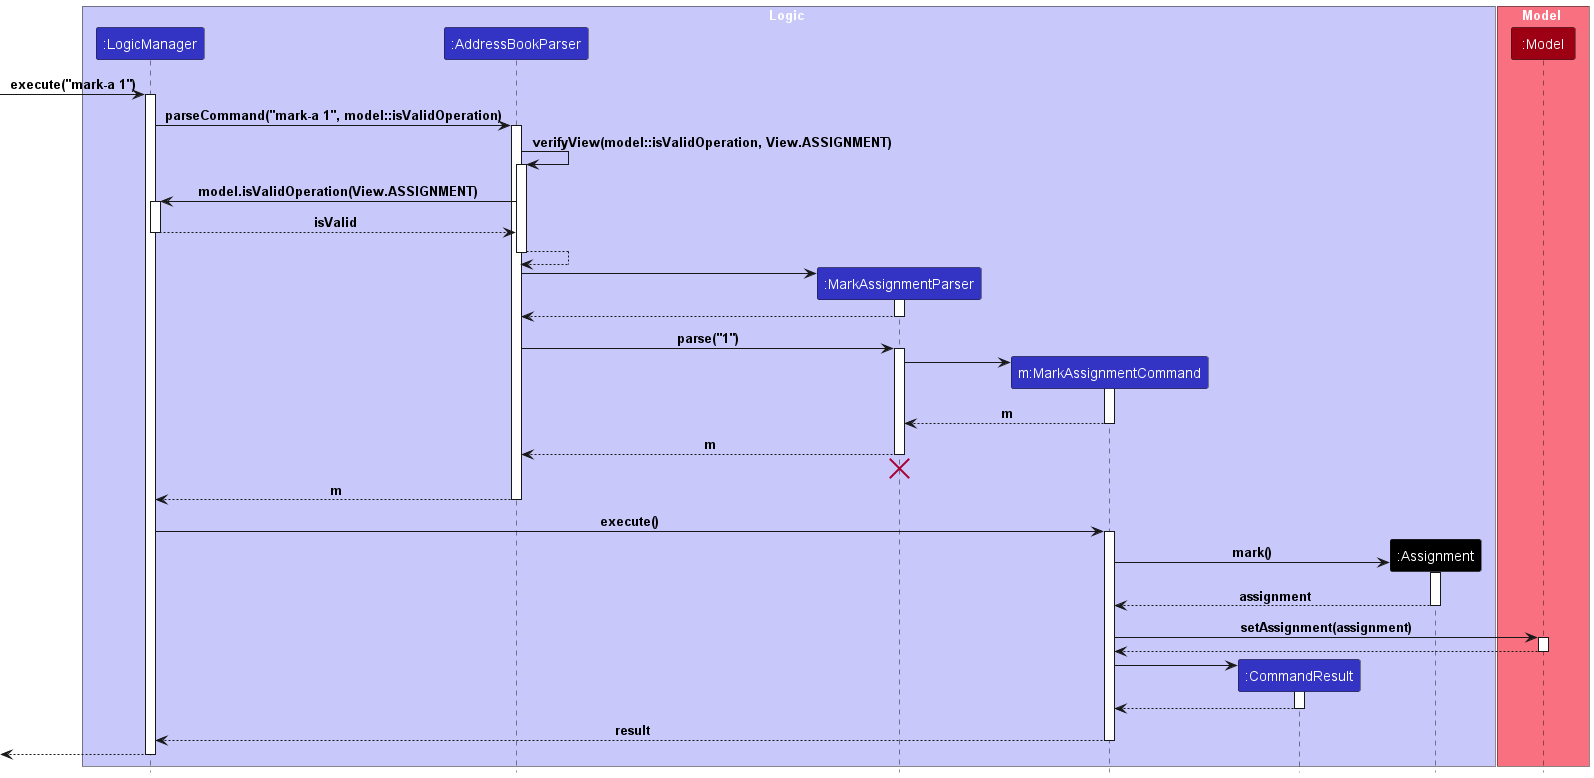
The following sequence diagram illustrates how the mark assignment operation works:
UnMark Assignment Feature
Similar internship feature: UnMark internship Task feature
What it does
Changes the status of an assignment at the specified one-based index of the assignment list from complete to incomplete.
If the index provided are larger than size of the list, the command will not be allowed and an error will
be thrown. If specified assignment is already incomplete, the command will not be allowed and an error will be thrown.
Example Use: unmark-a 1
Implementation
Upon entry of the unmark assignment command, a UnMarkAssignmentCommand class is created. The UnMarkAssignmentCommand class extends the
abstract Command class and implements the execute() method.
Before execution of this method, the verifyView() method is called, to verify that the user is in the Assignment view.
Upon execution of this method, the status of the assignment at specified one-based index is updated to incomplete.
Given below is an example usage scenario of how the unmark assignment command behaves at each step.
Step 1. User launches the application
Step 2. User executes unmark-a 1 to change the status of the assignment at index 1 to incomplete.
Step 3. If the index provided is valid and assignment is currently complete, the assignment at index 1 is updated to be incomplete
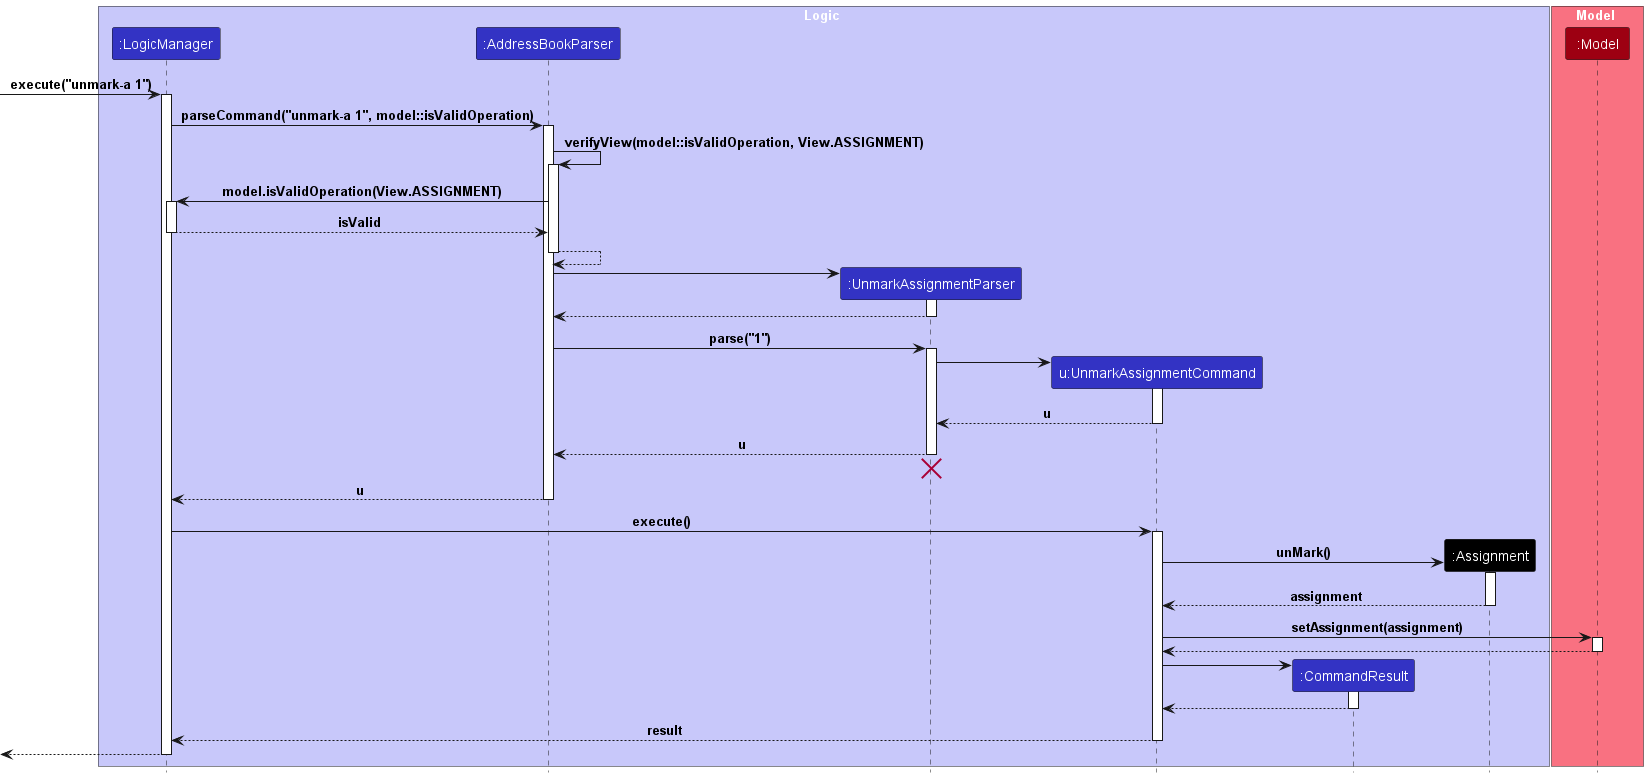
The following sequence diagram illustrates how the unmark assignment operation works:
Find Assignment Feature
Similar internship feature: Find internship Role feature and Find internship Task feature
What it does
Finds an assignment with the specified parameters.
Example Use: find-a CS2100
Implementation
Upon entry of the find assignment command, a FindAssignmentCommand class is created. The FindAssignmentCommand class
takes a predicate created by AssignmentContainsKeywordsPredicate class. The FindAssignmentCommand class extends the abstract
Command class and implements the execute() method which updates the model’s list of filtered assignments.
Before execution of this method, the verifyView() method is called, to verify that the user is in the Assignment view
Given below is an example usage scenario of how the find assignment command behaves at each step.
Step 1. User launches the application
Step 2. User executes find-a CS2100 to find an assignment with CS2100 in the name.
Step 3. The model’s list of filtered assignment is updated.
The following sequence diagram illustrates how the find assignment operation works:
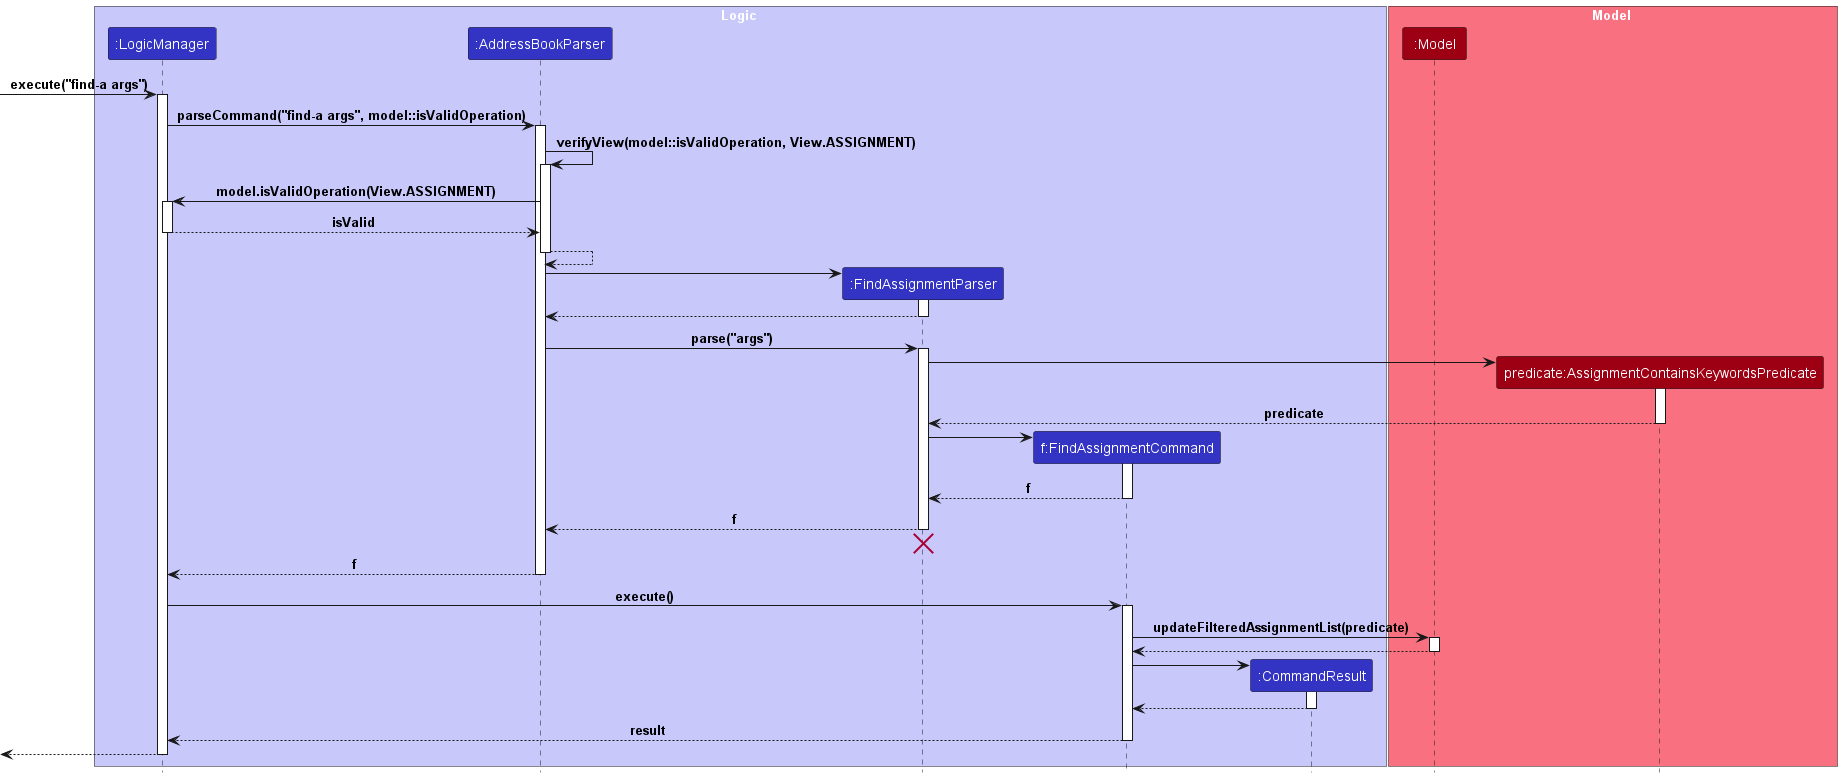
-
args: Refers to a valid sequence of arguments provided by the user.
List Assignment Feature
What it does
Lists all assignments, if no parameters are specified, or lists only the assignment with deadline within the specified parameters.
It will also change the view from Internships to Assignments (if applicable).
Example Use: list-a s/2024-01-01 12:00 e/2024-02-02 12:00
Implementation
Upon entry of the list assignment command, a ListAssignmentCommand class is created. The ListAssignmentCommand class
takes a predicate created by AssignmentBetweenStartandEndPredicate class. The ListAssignmentCommand class extends the abstract
Command class and implements the execute() method which updates the model’s list of filtered assignments.
On execution, the ListAssignmentCommand class calls the setView() method of the Model class, to change the view to Assignments (if necessary).
Given below is an example usage scenario of how the list assignment command behaves at each step.
Step 1. User launches the application
Step 2. User executes list-a s/2024-01-01 12:00 e/2024-02-02 12:00 to filter the assignment list to show assignments between
2024-01-01 12:00 and 2024-02-02 12:00 inclusive.
Step 3. The model’s list of filtered assignment is updated.
The following sequence diagram illustrates how the list assignment operation works:
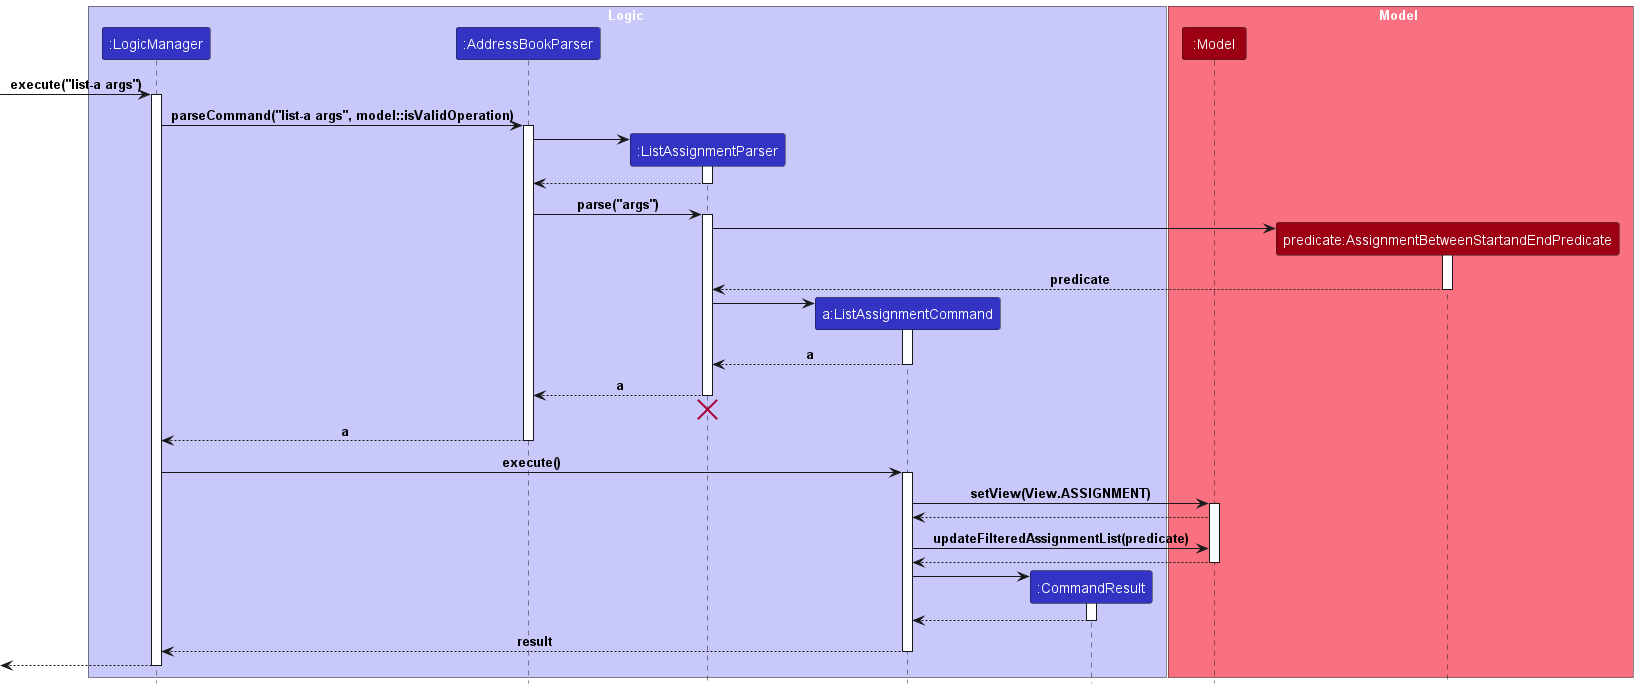
-
args: Refers to a valid sequence of arguments provided by the user.
Documentation, logging, testing, configuration, dev-ops
Appendix A: Product Scope
Target user profile:
- has many assignments to keep track of as a student in university
- is someone who is applying for computer science related internship roles, and will have many rounds of interview before potentially getting an offer
- prefer desktop apps over other types
- can type fast
- prefers typing to mouse interactions
- is reasonably comfortable using CLI apps
Value proposition: manage assignments deadlines and internship applications faster than a typical mouse/GUI driven app
Appendix B: User stories
In the table below, user refers to the Computer Science student.
Priorities: High (must have) - * * *, Medium (nice to have) - * *, Low (unlikely to have) - *
| Priority | As a … | I want to … | So that I can… |
|---|---|---|---|
* * * |
new user | see usage instructions | refer to instructions when I forget how to use the App |
* * * |
user | add a new assignment | keep track of the assignments that I need to complete |
* * * |
user | see the status and the deadline of my assignments | monitor my progress and plan my time based on the number of tasks that needs to be completed |
* * * |
user | delete an assignment | remove entries that I no longer need to track |
* * * |
user | mark an assignment as completed | track my progress of my assignments |
* * * |
user | unmark an assignment which is currently completed | track my progress if I marked something wrongly without needing to delete the entry |
* * * |
user with many assignments | see all the current assignments, and all their details | have a understanding of how many assignments I have in total currently |
* * * |
user with many assignments | view my assignments in chronological order of the deadlines (ie, assignment with earliest deadline first) | understand which assignment is due earlier, and therefore I can prioritise it |
* * * |
user | add information about a role that I am applying to such as the role name, company, salary, overall status of the application etc. | keep track of the roles that I have applied to |
* * * |
user | add information about the tasks that I have to complete for each of the roles that I have applied for such as the OA, interview 1, interview 2 etc. | keep track of the deadlines for each task related to my application at every stage |
* * * |
user | delete information about the role that I have applied for | remove entries of roles that I no longer want to track |
* * * |
user | delete information about the tasks related to an application | remove entries of tasks that I no longer want to track |
* * * |
user | update the overall outcome of the role that I have applied for (eg: follow up, rejected, success) | keep track of the current status of an application |
* * * |
user | update the outcome of a task related to an application (eg: follow up, rejected, pending) | keep track of the outcome of completing that task |
* * * |
user | mark the status of a task related to an application to “complete” | keep track of which task I have completed and not miss any deadlines related to my application |
* * * |
user | unmark the status of a task related to an application to “incomplete” | easily change the status of the task, in case I marked it as complete wrongly |
* * * |
user | see all the roles which I have applied for, and the information related to each role | have an overview of each application’s information and outcome |
* * * |
user | see all the tasks which I have for all the roles I have applied for | have an overview of all the tasks which I currently have, and their status, deadline and outcome |
* * |
user with many deadlines | calendar view which shows the task which needs to be completed by that date | have a quick overview of the deadlines for a particular day |
* * |
user with many assignments | filter my assignments by deadline (ie, only view assignments due within a certain time frame) | have an overview of the assignments due within a certain time frame, and I can plan ahead for busy time frames |
* * |
user | edit the description of a previously added assignment | update the assignment if there were changes to the requirements, or if I want to note more information down for myself |
* * |
user | find my assignments by a certain keyword only | find an assignment and view its details without needing to scroll through the whole list of assignments |
* * |
user | add in information about when I plan to complete an assignment by | manage my time and finish assignments before their deadline |
* * |
user with many internship tasks | filter my internship tasks deadline (ie, only view tasks due within a certain time frame) | have an overview of the internship tasks due within a certain time frame, and I can plan ahead for busy time frames |
* * |
user with many internship tasks | find my internship application information based on certain keywords only | find an internship role and view its associated details and tasks without needing to scroll through the whole list of internships |
* |
user with many internship applications | view overall statistics for my past applications such as at which stage do I get rejected or accepted | understand which stage I need to improve on and which stage I’m stronger in |
Appendix C: Use cases
For all use cases below, we assume the following unless specified otherwise
- The System is
CampusCompanion - The Actor is the
user - The following preconditions
- The
userhas launched theCampusCompanionapplication.
- The
Furthermore, some use cases are similar when manipulating assignments, internship roles and internship tasks.
Therefore, to keep the developer guide concise, the use cases elaborated upon below are only detailed for assignments (UC1 to 8 in the table below). Nonetheless, they can be extrapolated for internships roles and tasks too, without changes to the major details within the use case. Such associated pairs of use cases are listed in the table below.
| Assignment Use Case | Internship Role Use Case | Internship Task Use Case |
|---|---|---|
| UC1 - Add Assignment | UC9 - Add Internship Role | UC14 - Add Internship Task |
| UC2 - Delete Assignment | UC10 - Delete Internship Role | UC15 - Delete Internship Task |
| UC3 - Mark Assignment as complete | Not Applicable | UC16 - Mark Internship Task as complete |
| UC4 - UnMark Assignment as incomplete | Not Applicable | UC17 - UnMark Internship Task as incomplete |
| UC5 - List Assignments | UC11 - List Internship Role | Not Applicable |
| UC6 - Filter Assignments by deadline | Not Applicable | Not Applicable |
| UC7 - Edit Assignments information | UC12 - Edit Internship Role information | UC18 - Edit Internship Task information |
| UC8 - Find Assignment by keyword | UC13 - Find Internship Role by keyword | UC19 - Find Internship Task by keyword |
UC1: Add an assignment
MSS
- User requests to add an assignment by specifying information about the assignment
-
CampusCompanion adds the assignment
Use case ends.
Extensions
- 1a. User enters invalid command.
- 1a1. CampusCompanion prompts user to correct the format of the command.
- 1a2. User enters command and information to add an assignment.
Steps 1a1-1a2 are repeated until a valid add command is entered.
Use case resumes from step 2.
- 1b. CampusCompanion detects duplicate assignment entry.
- 1b1. CampusCompanion prompts user to not enter duplicate information
- 1b2. User re-enters command to add an assignment.
Steps 1b1-1b2 are repeated until a unique entry is entered. Use cases resumes from step 2.
UC2: Delete an assignment
MSS
- User requests to list all assignments
- CampusCompanion shows a list of assignments with their details
- User requests to delete a specific assignment in the list
-
CampusCompanion deletes the assignment
Use case ends.
Extensions
-
2a. The list is empty.
Use case ends.
- 3a. User enters invalid command.
- 3a1. CampusCompanion prompts user to correct the format of the command.
- 3a2. User enters command to delete an assignment.
Steps 3a1-3a2 are repeated until a valid delete command is entered.
Use case resumes from step 4.
-
3b. The given index is invalid.
- 3b1. CampusCompanion prompts user that the index is invalid.
- 3b2. User re-enters command.
Steps 3b1-3b2 are repeated until a valid index is entered.
Use case resumes from step 4.
UC3: Mark an assignment
MSS
- User requests to list all assignments
- CampusCompanion shows a list of assignments with their details
- User requests to mark a specific assignment in the list
-
CampusCompanion marks the assignment
Use case ends.
Extensions
-
2a. The list is empty.
Use case ends.
- 3a. User enters invalid command.
- 3a1. CampusCompanion prompts user to correct the format of the mark command.
- 3a2. User enters command to mark an assignment.
Steps 3a1-3a2 are repeated until a valid mark command is entered.
Use case resumes from step 4.
-
3b. The given index is invalid.
- 3b1. CampusCompanion prompts user that the index is invalid.
- 3b2. User re-enters command.
Steps 3b1-3b2 are repeated until a valid index is entered.
Use case resumes from step 4.
UC4: Un-mark an assignment
MSS
- User requests to list all assignments
- CampusCompanion shows a list of assignments with their details
- User requests to unmark a specific assignment in the list
-
CampusCompanion unmarks the assignment
Use case ends.
Extensions
-
2a. The list is empty.
Use case ends.
- 3a. User enters invalid command.
- 3a1. CampusCompanion prompts user to correct the format of the unmark command.
- 3a2. User enters command to unmark an assignment.
Steps 3a1-3a2 are repeated until a valid unmark command is entered.
Use case resumes from step 4.
-
3b. The given index is invalid.
- 3b1. CampusCompanion prompts user that the index is invalid.
- 3b2. User re-enters command.
Steps 3b1-3b2 are repeated until a valid index is entered.
Use case resumes from step 4.
UC5 - List Assignments
MSS
- User requests to list all assignments
-
CampusCompanion shows a list of assignments with their details
Use case ends.
Extensions
- 1a. CampusCompanion detects an error in the command format.
- 1a1. CampusCompanion prompts user to correct the format of the list command.
- 1a2. User enters command to list assignments.
Steps 1a1-1a2 are repeated until a valid list command is entered.
Use case resumes from step 2.
UC6 - Filter Assignments by deadline
MSS
- User requests to list only assignments with deadline within a certain time period
-
CampusCompanion shows a filtered list of assignments with their details
Use case ends.
Extensions
- 1a. CampusCompanion detects an error in the command format.
- 1a1. CampusCompanion prompts user to correct the format of the list command with filter.
- 1a2. User enters command to list assignments.
Steps 1a1-1a2 are repeated until a valid list command is entered.
Use case resumes from step 2.
- 1b. The given date is not valid (before current date).
- 1b1. CampusCompanion prompts user to correct the date range.
- User enters command with valid date range.
Steps 1b1-1b2 are repeated until a valid list command is entered.
Use case resumes from step 2.
UC7 - Edit Assignments information
MSS
- User requests to list all assignments
- CampusCompanion shows a list of assignments with their details
- User requests to edit an assignment’s information by specifying the updated information.
-
CampusCompanion confirms the update of the assignment’s information.
Use case ends.
Extensions
-
2a. The list is empty.
Use case ends.
- 3a. CampusCompanion detects an error in the command format.
- 3a1. CampusCompanion prompts user to correct the format of the edit command.
- 3a2. User enters command to edit assignments.
Steps 3a1-3a2 are repeated until a valid edit command is entered.
Use case resumes from step 4.
-
3b. The given index is invalid.
- 3b1. CampusCompanion prompts user that the index is invalid.
- 3b2. User re-enters command.
Steps 3b1-3b2 are repeated until a valid index is entered.
Use case resumes from step 4.
UC8 - Find Assignment by keyword
- User requests to find assignments that meet a particular criteria.
-
CampusCompanion shows a list of assignments that meet the criteria requested by user.
Use case ends.
- 1a. CampusCompanion detects an error in the command format.
- 1a1. CampusCompanion prompts user to correct the format of the find command.
- 1a2. User enters command to find assignments.
Steps 1a1-1a2 are repeated until a valid find command is entered.
Use case resumes from step 2.
Appendix D: Non-Functional Requirements
- Should work on any mainstream OS as long as it has Java
11or above installed. - Should be able to hold up to 500 assignments or internship details without a noticeable sluggishness in performance for typical usage.
- A user with above average typing speed for regular English text (i.e. not code, not system admin commands) should be able to accomplish most of the tasks faster using commands than using the mouse.
- The user interface should be intuitive enough for users who are not IT-savvy.
- The product should be for a single user.
- The software should work without requiring an installer.
- The GUI should work well for standard resolutions.
Appendix E: Instructions for manual testing
Given below are instructions to test the app manually.
Launch and shutdown
-
Initial launch
-
Download the jar file and copy into an empty folder
-
Double-click the jar file Expected: Shows the GUI with no data. On startup, the view is the
internshipview
-
-
Shutdown the application
- Close the application or type in
exitin the Command box. Expected: The GUI closes.
- Close the application or type in
Adding an assignment
-
Adding an assignment
-
Prerequisites: List all assignments using the
list-acommand. -
Test case:
add-a n/Assignment 1 d/description e/ 2024-06-18 20:00 p/ 2024-08-19 18:00 t/tag s/complete
Expected: New assignment added into the list. Assignment will appear on the calendar on the deadline. Details of the added assignment shown in the status message. -
Test case:
add-a n/Assignment 1
Expected: No assignment is added because there are mandatory fields not present. Error details shown in the status message. -
Test case:
add-a n/Assignment 1 e/2020-01-01
Expected: No assignment is added because the deadline is after the current date. Error details shown in the status message. -
Other incorrect delete commands to try:
add,adda
Expected: Similar to previous.
-
Deleting an assignment
-
Deleting an assignment while all assignments are being shown
-
Prerequisites: List all assignments using the
list-acommand. Multiple assignments in the list. -
Test case:
delete-a 1
Expected: First assignment is deleted from the list. Details of the deleted assignment shown in the status message. -
Test case:
delete-a 0
Expected: No assignment is deleted. Error details shown in the status message. -
Other incorrect delete commands to try:
delete,delete x,...(where x is larger than the list size)
Expected: Similar to previous.
-
Listing all assignments
-
List all assignments while the current view is showing internships
-
Prerequisites: List all internships using the
list-icommand. -
Test case:
list-a
Expected: All assignments previously added is shown. Assignments are sorted in order of deadline. Calendar view changes to show assignments. -
Test case:
list-a e/2024-01-01
Expected: All assignments with deadline before 2024-01-01 23:59 inclusive is shown. -
Test case:
list-a s/2024-01-01
Expected: All assignments with deadline after 2024-01-01 00:00 inclusive is shown. -
Other incorrect list commands to try:
list,list-a e/01-01-2023,list-a s/
-